Bullet Journaling: Everything You Need to Know to Get Started
December 5, 2019
Step 1: Deciding if bullet journaling is right for you
A bullet journal (sometimes abbreviated as BuJo), is an individualized mix of a planner, journal, sketchbook, and diary. It typically starts with a blank journal that you design to fit your needs, academically, personally, or maybe both. It was popularized by Brooklyn-based digital product designer Ryder Carroll, who branded what he calls the “Bullet Journal Methodology,” which focuses on mindfulness and “the art of intentional living.”
Carroll also hosts an official Instagram account for the brand to share bullet journals from users around the world. If you’re looking to start a bullet journal, I would recommend looking at this account instead of buying branded Bullet Journal products, mostly because your journal is really what you make it. You can draw on any inspiration you want, but don’t limit yourself to the “official” methodology.
I’ve personally been journaling for a little over a year now. I use it almost exclusively for school but I’ve recently been trying to use it to track my water intake and sleep, too. I started mine at the beginning of sophomore year to keep track of homework and upcoming tests, but it developed into a creative outlet for me that allows me to take a break from academics but still feel productive.
I would recommend bullet journaling to anyone looking for a new way to organize their life. If you take the time to work hard on a completely individualized planner, I think you’re more likely to actually write down, check, and do your homework. It’s also completely unrestrictive in format and design, so you can do whatever works for you or will encourage you to be productive. How you decide to create your journal will determine what supplies you may need. These are the things you may need:
Step 2: Getting supplies
- A journal
If you want to start a bullet journal, you obviously need something to write in. I’d personally recommend using a dotted notebook because I like using grids and lines but I find dots to be a bit less distracting and restrictive than traditional graph paper. These are a bit more difficult to find in regular craft stores, so skip the trouble of driving around and find one online. The brand I use is called ROF, which is essentially the same as more well known brands like Moleskine and Leuchtturm1917 (just less expensive!). You can also use a blank notebook in the sketchbook isle of any craft store. If you do decide to use a sketchbook, pick up a six inch ruler, too, since you won’t have dots or lines to guide you. I do not recommend using a lined notebook as it’s much more restrictive and doesn’t lend itself well to the concept of bullet journaling.
2. Writing Utensils
I have seen all black and white journal spreads, but I like to use a lot of colors. Whatever palettes you decide on using, get enough pens, pencils, and markers that you give yourself options. For gel pens, I like Gelly Roll, which you can get on Amazon. Fine tip pens are also useful, especially for small details. Micron pens are probably the best for this, but are a bit expensive. You may also need brush pens and highlighters, the best brand for both of which is Zebra Pen Mildliners. Pencils and ballpoint pens work, too, though! It’s up to you!
3. Adhesives
If you want to put photos, ticket stubs, or other fun mementos in your journal get some washi tape and glue dots. You’ll want to use washi tape when it contributes to the design of the spread, whereas if you only want the item you’re attaching, use glue dots as a mess free and more aesthetically pleasing alternative to glue or transparent tape. Washi tape is at every craft store, often on sale or sold in packs for pretty cheap. A pack of glue dots are a bit expensive since they’re in the scrapbooking isle (and scrapbooking supplies are expensive!), but they’re worth the investment because one pack should last you a long time. Stickers are also a fun way to embellish a spread, but I would recommend not getting a set from a regular craft store since you can find a wider variety online.
4. Paper Scraps
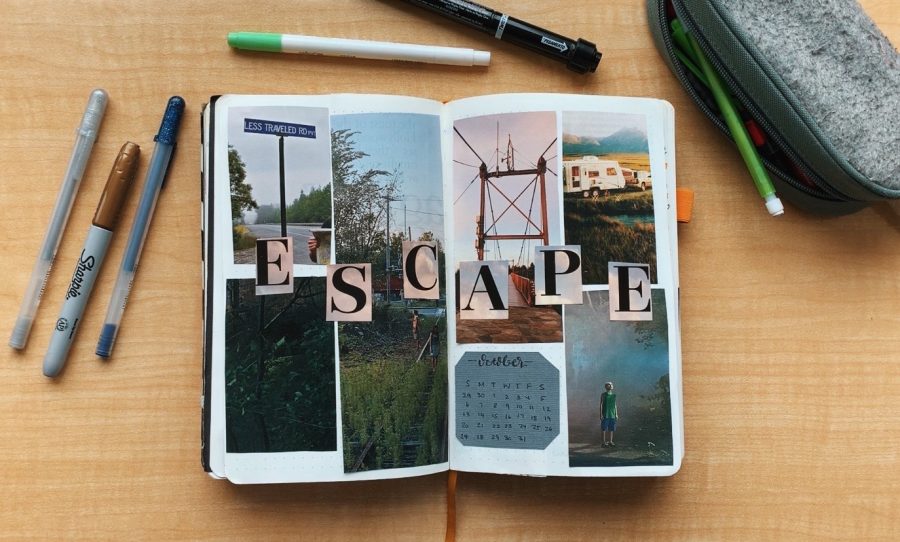
I love to make collages and use magazine clippings when I journal, but if you’re interested in a more minimalist approach this might not be your thing. I think scrap paper is a good option, too, because it can add color to a spread and make the page a bit more dynamic and dimensional.
Step 3: Setting up your journal
Now that you know what you need, you’ll need to figure out what you’re going to do with it. Organization is probably the fun part of journaling for me, because I love doing something new every week, but it can seem overwhelming or time consuming when you’re beginning to learn what works best for you.
Setting up your journal can be either weekly or monthly. Some people use monthly spreads as a way of creating coherency and consistency throughout their journal, but I prefer to do something really different between weeks because using the same theme for a month straight is a bit boring to me.
For my set up, I usually include a monthly introduction page. This is usually just a calendar and an overview of what I have coming up that month. If you wanted to track physical or emotional health for the month (for example, water intake, habits, or even short diary entries), put these pages next to the monthly overview. I track my sleep on these pages and it works well for me to keep each entry on the same page, but you can also put trackers on weekly spreads.
Weekly spreads can follow a theme for the month or can vary. On my weekly spreads, I include a place to write homework and events down for each day of the week, starting on Monday. I also leave space for upcoming events and assignments, which helps me with time management, especially on the weekends.
After four weeks, you may want to include a reflection of the month or another transition page before the next monthly overview page. I usually choose a quote that I read or liked that month and make a page for that as my transition.
Step 4: Keeping up with it
I think the most difficult part of journaling for me is finding time to do it consistently. Sometimes it’s easier to just write homework down on a piece of scrap paper, but when I make time to journal I definitely feel more organized and motivated to do my work.
Writing in your journal every day can help you get work done and visualize how to manage your time. You can also create a key for indicating assignment importance and the time it’s done. For example I use bullet points to write down work. I put a star next to the point if it’s important, a slash through it if it’s done, and an arrow through it if I’m doing it later. You can make whatever kind of key works for your work habits and try out something new if you need.
You can also find spread designs online for inspiration to keep journaling. I like to use Pinterest, but Instagram accounts like @Bujodani and @annajournals_ have lots of nice ideas, too. YouTube also has tons of videos of set ups and supplies if you want to see other peoples’ processes.
Another way to keep up with your journal is to find friends to do it with. Finding people who share your interest can help to hold you both accountable and help to find what journaling habits work best for you.
Most importantly, do what you enjoy. When you find joy in journaling, it’s much easier to find motivation to do it. If you put in the effort, journaling is definitely worth your time and attention. It may be difficult at first, but once you figure out what you like, you’ll discover how rewarding and satisfying it is to be consistently creative.